

Jensen Healey
Dashboard Repair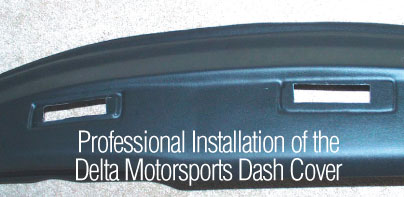
by James Brinkley
Having made
the decision to restore my dash as cheaply as possible I originally
purchased an auto vinyl repair kit and black vinyl spray paint - most
auto repair stores carry these products, I think I bought my kit from
Walmart for about $15 with the paint. Anyway to cut a long story short
don’t waste your time or money with this approach - it is time
consuming and the results/repairs although initially look good didn’t
last a single hot and sunny day - the old splits in the dash reappeared
as soon as the dash warmed up and looked worse than ever.
My next approach was to buy and install a DASH
CAP from Delta Motorsports. $89 plus shipping: On arrival
the cap is a very well made product and much thicker than I expected
- it is a perfect fit and is designed to simply slip over the existing
dash and be siliconed into place. It comes with very easy to follow
instructions which I partially followed. The main problem with the cap
is that the surface windscreen vents are designed to be cutouts and
thus will sit under the cap. This to me lets the interior down and makes
a dash cap stand out as ‘well’ a dash cap ! I wanted the
end result to not look like a dash cap - so I set about figuring out
a way to secure the dash cap with the windscreen metal vent plates mounted
on top of the dash cap - thus giving the appearance of the cap being
the original dash.
The following description is only for those of you considering a dash
cap who don’t mind first removing the entire dash - as I mentioned
earlier you can simply cut out the vent holes and glue the thing straight
over the stock dash - wether or not you’ll be happy with the end
result is a personal thing…
Once the instrument cluster and dash is out you’ll need to remove
the vent grates and plastic vent tubes from the back of the dash. Next
slip the dash cap over the dash and mark the windscreen vent holes with
a marker pen - Remove the dash cap and cut out the holes which you just
marked.
You should also remove the cars ID plate for later installation on top
of the new dash cap.
The next stage of the install is to simply following the actual installation
instructions as supplied with the dash - clean your old dash surface,
apply the silicone adhesive (also supplied with the cap) and then mount
the cap to the dash. I used about a dozen clamps, spring clips and some
duct tape to hold the dash in place while the adhesive dries - at least
over night. I also secured the side corners in place with a couple of
large pop rivets. If you do this at the edges where the sides of the
dash meet the sides of the windscreen frame the rivets will be hidden
once the dash is put back into the car.
The front lip of the cap extends over the dash by about 1/2” but
this will also be hidden when wedged between the dash and the windshield.
You can trim it if you want - I left mine alone.
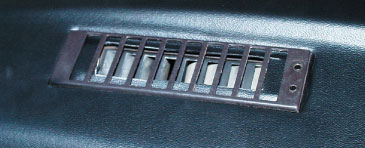
Once glued on you can attach the top vent grates - you’ll need
to drill two small holes for the back studs of the grate to fit through
the dash cap and dash. Because of the added thickness of the cap to
the dash you’ll find that the vent grill studs will protrude enough
through the dash for the metal backing plate and nuts to be attached
- but not the black plastic vent tubes. So attach the metal grills,
and backing plates with the original nuts.
The final stage is to now attach the plastic vent tubes to the underside
of the dash. I did this by drilling out large enough holes on both sides
of the vent tube so that the tube can sit flush against the metal backing
plate. I then siliconed and pop riveted the vent tube into there original
location.
Alternatively you could drill out the metal grills rear studs and just
use longer bolts which would go through both the cap, dash, backing
plate and vent tube.
(Don’t forget to put the vehicle ID plate back on with a couple
of pop rivets - before the dash goes back into the car)
With everything riveted, secured and glued the final results are very
good. With the dash and instruments back in place it really looks like
a new dash - without the tell-tale signs of it being a dash cap.
The whole installation took about 2 - 3 hrs with overnight dry time
of the cap on the dash. No need for any alcohol for this job but what
the heck it never hurts - right! Perhaps a 2 glass rating as per difficultness.
It’s a very worthwhile fix for our old cracked dashes and at $80
it’s pretty cheap too - for those of you with a larger budget
you can have your old dash completely restored for about $500 check
out www.justdashes.com for full information.
main | jensen | tech | people & places | marketplace | message board | join | garage | links | mail